Help with setup
Help with setup
I have hudiy installed and running but I’m unsure how to install or update from GitHub . Can you make a video or explain how I add obd2 and such .
Re: Help with setup
Hello,
All our OBD-II examples are available on GitHub:
https://github.com/wiboma/hudiy/tree/ma ... les/api/js
To run them, you’ll need to install and start an HTTP server. You’ll find instructions for installing and running an HTTP server on Raspberry Pi in the README:
https://github.com/wiboma/hudiy/blob/ma ... javascript
If you’d like the HTTP server to start automatically with your system, you can add a command like this to /etc/xdg/labwc/autostart:
The examples on our GitHub can be used as widgets in dashboards (https://github.com/wiboma/hudiy/blob/ma ... dashboards), overlays (https://github.com/wiboma/hudiy/blob/ma ... d#overlays), or applications (https://github.com/wiboma/hudiy/blob/ma ... plications).
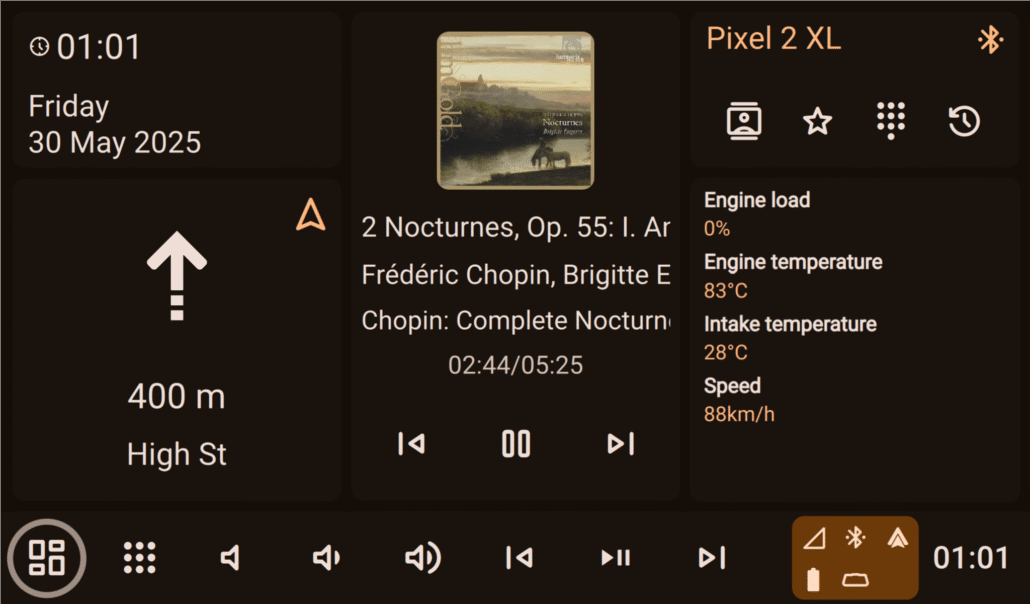
Here’s a sample config that adds https://github.com/wiboma/hudiy/blob/ma ... idget.html as a widget to the default dashboard:
(dashboards.json)
The dashboard:
To use OBD-II in Hudiy, you’ll first need to set up your ELM327 interface. Hudiy supports ELM327 connections over USB and Bluetooth. Take a look at this forum thread for details on configuring ELM327 in Hudiy:
viewtopic.php?p=122#p122
With ELM327, you can query the ECU for specific parameters using PIDs. You can read more about PIDs here:
https://en.wikipedia.org/wiki/OBD-II_PIDs
You can modify the examples from our GitHub however you like. For instance, you might use ChatGPT, Gemini, or DeepSeek to create more advanced HTML/JavaScript layouts, convert ECU parameter units, and much more.
All our OBD-II examples are available on GitHub:
https://github.com/wiboma/hudiy/tree/ma ... les/api/js
To run them, you’ll need to install and start an HTTP server. You’ll find instructions for installing and running an HTTP server on Raspberry Pi in the README:
https://github.com/wiboma/hudiy/blob/ma ... javascript
If you’d like the HTTP server to start automatically with your system, you can add a command like this to /etc/xdg/labwc/autostart:
Code: Select all
/usr/bin/http-server -p 12345 /path/to/your/directoryHere’s a sample config that adds https://github.com/wiboma/hudiy/blob/ma ... idget.html as a widget to the default dashboard:
(dashboards.json)
Code: Select all
{
    "dashboards": [
        {
            "isDefault": true,
            "action": "hudiy_dashboard",
            "widgets": [
                {
                    "type": "date_time",
                    "size": "small_narrow"
                },
                {
                    "type": "navigation",
                    "size": "medium_narrow"
                },
                {
                    "type": "now_playing",
                    "size": "large_narrow"
                },
                {
                    "type": "phone",
                    "size": "small_narrow"
                },
                {
                    "type": "web_static",
                    "size": "medium_narrow",
                    "url": "http://127.0.0.1:12345/obd_widget.html"
                }
            ]
        }
    ]
}To use OBD-II in Hudiy, you’ll first need to set up your ELM327 interface. Hudiy supports ELM327 connections over USB and Bluetooth. Take a look at this forum thread for details on configuring ELM327 in Hudiy:
viewtopic.php?p=122#p122
With ELM327, you can query the ECU for specific parameters using PIDs. You can read more about PIDs here:
https://en.wikipedia.org/wiki/OBD-II_PIDs
You can modify the examples from our GitHub however you like. For instance, you might use ChatGPT, Gemini, or DeepSeek to create more advanced HTML/JavaScript layouts, convert ECU parameter units, and much more.
Hudiy Team
Re: Help with setup
Ok I’m starting to get it . I was able to add web based apps like YouTube music, web radio and google maps. The issue I’m having is I can’t seem to get an onscreen keyboard to work . When I add it as an overlay it clicks out of my selection. Iv already removed all key bindings and hot keys . What’s a good way to implement an onscreen keyboard? Question 2 can I make a background option ? Iv tried using it as an overlay but it just covers the screen and leaves buttons unusable. How would I implement it into the app so it works ?
Re: Help with setup
Hudiy doesn’t have its own built-in keyboard yet, but we’re working on it.
For now, you can use squeekboard, which is the default on-screen keyboard on Raspberry Pi OS Bookworm. The tricky part is that there’s a bug in the Raspberry Pi fork: the version shipped with Bookworm uses the TOP layer, which means it won’t show correctly above fullscreen apps like Hudiy.
You can either patch and rebuild it yourself using dpkg, or just use our patched version included in the attached zip.
Here’s the relevant code: https://github.com/raspberrypi-ui/squee ... anel.c#L82 – it should be ZWLR_LAYER_SHELL_V1_LAYER_OVERLAY so that the keyboard shows up on top of fullscreen windows. The patched version in the zip already includes this change. You can simply replace it with the one in /usr/bin.
Squeekboard can be controlled via dbus (https://github.com/raspberrypi-ui/squee ... /README.md). With the patched version (so it displays properly above fullscreen windows), you can use Hudiy’s API and Overlays to show or hide squeekboard.
You can keep such an overlay always visible, or only show it on specific actions (like your custom action to launch YT Music) – https://github.com/wiboma/hudiy/blob/ma ... d#overlays (check the visibleOnActions parameter).
How to set it up:
To run the Python script, it’s best to create a venv so dependencies don’t clutter your system. For example:
And start the script:
The osk_overlay.html file needs to be served via an HTTP server. You can find instructions on how to install and run one in the README on our GitHub: https://github.com/wiboma/hudiy/blob/ma ... /README.md
Finally, you can configure it in overlays.json (adjust the size to your screen). For example:
Also, make sure to disable handleKeyboardEvents (https://github.com/wiboma/hudiy/blob/ma ... pplication), so the interface doesn’t intercept key presses from squeekboard. You’ll still be able to control the interface with buttons through the API.
For now, you can use squeekboard, which is the default on-screen keyboard on Raspberry Pi OS Bookworm. The tricky part is that there’s a bug in the Raspberry Pi fork: the version shipped with Bookworm uses the TOP layer, which means it won’t show correctly above fullscreen apps like Hudiy.
You can either patch and rebuild it yourself using dpkg, or just use our patched version included in the attached zip.
Here’s the relevant code: https://github.com/raspberrypi-ui/squee ... anel.c#L82 – it should be ZWLR_LAYER_SHELL_V1_LAYER_OVERLAY so that the keyboard shows up on top of fullscreen windows. The patched version in the zip already includes this change. You can simply replace it with the one in /usr/bin.
Squeekboard can be controlled via dbus (https://github.com/raspberrypi-ui/squee ... /README.md). With the patched version (so it displays properly above fullscreen windows), you can use Hudiy’s API and Overlays to show or hide squeekboard.
You can keep such an overlay always visible, or only show it on specific actions (like your custom action to launch YT Music) – https://github.com/wiboma/hudiy/blob/ma ... d#overlays (check the visibleOnActions parameter).
How to set it up:
- Create a simple Python script based on https://github.com/wiboma/hudiy/blob/ma ... hAction.py.
This script should register an action, for example toggle_osk_visibility.
The logic will just call dbus to show/hide squeekboard whenever toggle_osk_visibility is dispatched. - Your HTML overlay, when clicked, should trigger the toggle_osk_visibility action. Hudiy will forward it to the Python script, and the script will show or hide the keyboard.
To run the Python script, it’s best to create a venv so dependencies don’t clutter your system. For example:
Code: Select all
python3 -m venv /destination/path/to/your/osk/venv --system-site-packagesCode: Select all
source /destination/path/to/your/osk/venv/bin/activate
pip3 install pydbus protobuf protobuf websocket-clientCode: Select all
python3 osk.pyFinally, you can configure it in overlays.json (adjust the size to your screen). For example:
Code: Select all
        {
            "identifier" : "OSK",
            "action" : "",
            "width" : 80,
            "height" : 80,
            "x" : 0.0,
            "y" : 0.0,
            "visibility" : "NATIVE_UI_ONLY",
            "url" : "http://127.0.0.1:12345/osk_overlay.html",
            "controlAudioFocus" : false,
            "audioStreamCategory" : "NONE",
            "visibleOnActions" : [

            ],
            "staticPosition" : false
}- squeekboard1.png (166.99 KiB) Viewed 1535 times
- squeekboard2.png (51.75 KiB) Viewed 1535 times
- Attachments
-
- squeekboard.zip
- (6.08 MiB) Downloaded 111 times
Hudiy Team
Re: Help with setup
somehow I'm getting a big red exclamation mark when I edited the dashboards.json as stated above and started the http server using 12345 port automatically. I didn't setup the ELM system as I thought it should at least show the html display just without the real value. any idea what is happening? if I use the file path to the obd_widget.html in the dashboards.json, it work. this means I didn't setup correctly somewhere.
- Attachments
-
- usefilepath.jpg (45.95 KiB) Viewed 1405 times
-
- obd_widget_error.jpg (49.98 KiB) Viewed 1405 times
Re: Help with setup
This is caused by the fact that the URL specified in the widget is not accessible. Try checking if you can open this URL in your browser. There may be an issue with the path to the file, the HTTP server port, or the server may have been started after Hudiy was already running.
Hudiy Team
Re: Help with setup
Hello. After many hours I managed to create a cockpit in html, I have everything set up and functional as far as the display is concerned, I just have a problem with the api. I used AI to load the api but nothing happens, nothing is displayed. I am sending the file cockpit.html, if you can help, please advise where I have a mistake and what else is needed so that the api is displayed the way I want. Thank you for your help.
I don't want to insert the cockpit.html file, I don't know why, so I can't send it as an attachment.
I don't want to insert the cockpit.html file, I don't know why, so I can't send it as an attachment.
Re: Help with setup
Could you please post content of your configuration files (applications.json, dashboard.json)? Are you using HTTP server to serve the HTML file or loading it via file://? If you use API the same way as in our HTML/JavaScript examples from GitHub, then your HTML/JavaScript code should be server by HTTP server due to loading of additional js scripts (HudiyClient and protobuf) - this is security restriction that comes from web browser.Mirec wrote: Tue Sep 23, 2025 6:43 pm Hello. After many hours I managed to create a cockpit in html, I have everything set up and functional as far as the display is concerned, I just have a problem with the api. I used AI to load the api but nothing happens, nothing is displayed. I am sending the file cockpit.html, if you can help, please advise where I have a mistake and what else is needed so that the api is displayed the way I want. Thank you for your help.
I don't want to insert the cockpit.html file, I don't know why, so I can't send it as an attachment.
Hudiy Team
Re: Help with setup
So, I managed to get the API working in my cockpit, for now I'll just send a photo of the project, the details will be fine-tuned. If there is interest, I'll send complete information about the project. Currently, 2 7" displays are connected. Display 1-7" touch 1024x567 (used for Android Auto, display 2-7" no touch 1024x768 (will be used instead of the dashboard). Many parameters can be set nicely in the code. When the cockpit is finally finished, I'll share it with you. Alternatively, you can send some suggestions for graphics, etc.
- Attachments
-
- 20250924_221650(1).jpg (696.46 KiB) Viewed 1252 times
-
- 20250924_221741(1).jpg (6.01 MiB) Viewed 1252 times